View Your HTML File Directly From Visual Studio Code

One thing I noticed when using VS Code that there was no quick action to view your website changes from this text editor. In the past I would use Notepad++ for simple changes and view those changes by selecting Run > Open in Chrome or hitting the appropriate key binding. It seemed odd to me that VS Code is missing this pretty basic bit of functionality from any of it’s menu items. For the solution, I went ahead and created my own Task that I could run when I wanted to view my changes in Chrome, Firefox, etc.
Microsoft does a great job documenting all the uses and functionality available to you as a developer here.
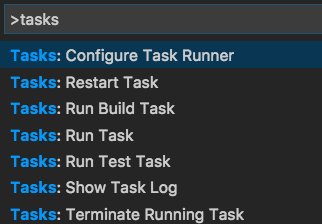
If you haven’t created or ran any tasks yet in your project, the tasks.json file will not appear in your folder list under .vscode quite yet. To get this file created, press Control (or Command on MacOS) + Shift + P in order to bring up the Command Palette. Type “task: Configure Task Runner” into the Command Palette and select “Configure Task Runner” as pictured below.
Note that this only works when you have a folder opened in Visual Studio Code, if you just have a file opened this will not work for your needs. If you have just a file open, you would see the warning below.
![]()
Next, select “Others”.
Now let’s dive into the code that we want in our tasks.json file.
{
// See https://go.microsoft.com/fwlink/?LinkId=733558
// for the documentation about the tasks.json format
"version": "0.1.0",
"tasks":[
{
"taskName": "hello",
"command": "echo",
"isShellCommand": true,
"args": ["Hello World"],
"showOutput": "always"
},
{
"taskName": "View Site",
"command": "Chrome",
"osx": {
"command": "/Applications/Google Chrome.app/Contents/MacOS/Google Chrome"
},
"windows":{
"command": "explorer.exe"
},
"args": [
"${file}"
]
}
]
}
The first task in the array is just a sample command that comes with the tasks.json file by default. I left that code as part of this example to illustrate how to place multiple tasks within one configuration file.
The taskName field is what this command will be known as and called by within the Command Palette. You can see that my example includes both the commands for Windows and for MacOS. That way, this command will work on both Operating Systems. The MacOS command points to the application itself while for Windows, we are just running the default browser through the explorer.exe command. Finally, we pass an argument which is the current file that is open in VS Code when the task is invoked.
To test out this new functionality, navigate back to the back would like to preview in Chrome and hit Ctrl + Shft + P (Cmd + Shft + P in MacOS) and type in “tasks: run task” and hit enter. You’ll see the echo and Visit Site tasks listed since we have two tasks defined in our tasks.json.
![]()
Go ahead and select “View Site”. Your default browser (or Chrome if on MacOS) should now display the file in focus from VS Code. Awesome!